Adding items
So far, so good, but walking around in an empty room is pretty boring, right?
Also, if you move the character to the right side of the room, he walks over the barrels in the background. That won’t do.
Let’s fix both. We start by making the room interactive!
Adding an activity
Let’s make Graham comment on the “Free cocktails” note on the blackboard.
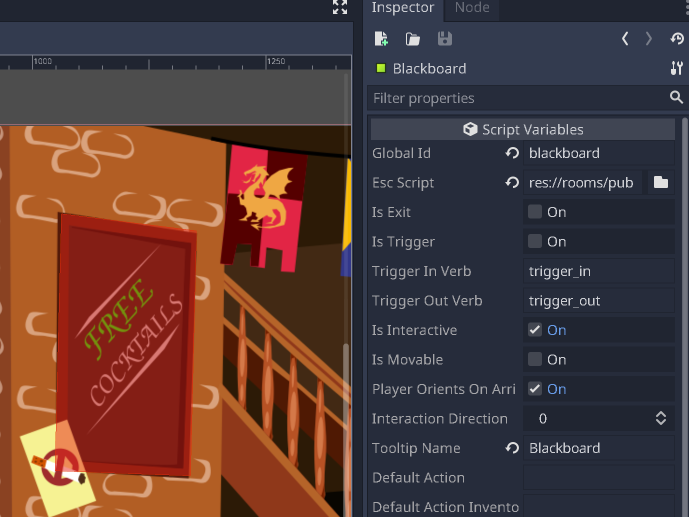
Add an ESCItem node to the ESCRoom and call it “Blackboard”. Set
its Global id parameter to “blackboard”.
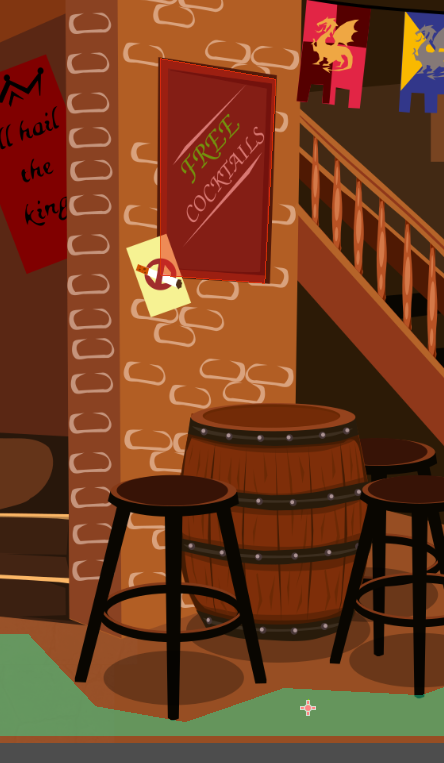
Next, add a CollisionPolygon2D node to the ESCItem node and draw
a polygon around the blackboard image in the background. Doing so will make
that area a hotspot to click on.
Hint
The ESCItem node also has a Tooltip parameter that can be used
by UIs to display a hint about the item when the mouse is hovering over
it. For example, the simplemouse UI displays the tooltip next to
the mouse pointer.
Now that we’ve told Escoria that the blackboard area is interactive, we still need to tell it what to do if the player, for example, uses the verb “look” on it.
For this, we go back to ASHES. First, we create a new ASHES file in the pub folder and call it “blackboard.esc”.
We connect this to the blackboard item. The blackboard item should look like this now:
Using events, we can tell Escoria what to do when the player carries out actions on the item.
Events are called in much the same way as the verbs that the player uses.
Note
Escoria uses the term “verb” to describe an action that the player wants to carry out. In the “9 verbs” UI, this is achieved with buttons that represent each verb directly (like “look”, “use” or “walk”). In the simple mouse UI, the verb is expressed by different mouse pointers (e.g. a magnifying glass expresses the “look” verb).
An example of an event might be to have Graham say something when the player “looks” at the blackboard.
For this, we add a new event :look to our ESC file and use the say
command to make Graham talk:
:look
  say("graham", "That's good to hear. I'm thirsty.")
The say command expects the player character’s global ID as the first
parameter and the text to say as the second parameter. (See the
documentation)
Hint
Global IDs in ASHES can also be specified without the need for quotation
marks by using a dollar sign ($) as a prefix, e.g. $graham.
Hint
Now would be a good time to make sure that a dialog manager plugin is enabled for your game! You’ll probably want to use the provided simple dialog manager, so Open up your project settings, go to the “Plugins” tab, and make sure that “Escoria Simple Dialogs” is enabled.
If you don’t define an ESCDialogLocation in your player scene, any dialog will
appear at the top of the screen.
So let’s add an ESCDialogLocation as a child of ESCPlayer.
Name this node “dialog_position” (this name is mandatory).
Now, any dialog will appear under the character by default. You can also move the node in the 2D editor above Graham’s head to have dialog appear in a more regular location.
Try it out! Depending on which UI you chose, select either the look verb or the look pointer and click on the blackboard. You should notice that Graham will neither walk to the blackboard nor speak the line we coded above.
Hint
By default, Escoria uses the ESCItem’s position when the player
attempts to reach it. The blackboard ESCItem is located at position
(0,0) in the room. Since this position is out of reach (i.e. it is not
included in the NavigationRegion2D in the ESCTerrain), Graham is
unable to reach it.
To fix this issue, we need to add an interaction position to the blackboard
ESCItem so that Escoria will then use this specific position instead of
the ESCItem position itself.
Simply add a new ESCInteractionLocation node as a child of the blackboard ESCItem
and move it in front of the blackboard, somewhere in the walkable area in front
of the barrel.
Run the game again: Graham should now walk to the blackboard and the text above should be displayed.
Making the player walk behind items
The other thing we should address is making Graham move behind the barrels instead of overtop of them in order to achieve a three-dimensional effect.
For this, we’ve added an asset that only includes the barrels on a transparent background.
Again, add a new node to the ESCRoom node and select
ESCItem as the node type. Name it “Barrels”, assign it a global ID of
“barrels”, add a Sprite2D node to this new item, and set the Texture of
the sprite node to the foreground barrels’ picture.
Hint
You can use a lot of different node types as children of ESCItems
where it makes sense to - AnimatedSprite2D, AnimationPlayer,
or Polygon2D for example.
If you use a control node like TextureRect or ColorRect,
they will cause problems with mouse interactions. You will need to
modify the properties of the TextureRect / ColorRect and set the
“Mouse Filter” setting to “Ignore”.
In the 2D editor, move the new item so it appears directly over the barrels in the background (the ones furthest to the right). You can use the arrow keys of your keyboard for added precision.
To make Graham walk behind the barrels, Escoria uses a little trick:
The z-index property is used by Godot to know which object to draw first.
Objects with a lower z-index are drawn first while objects with a higher z-index are drawn last and, therefore, over those objects with a lower z-index (this is in addition to the node order in the scene tree where the bottom-most nodes are drawn last).
Escoria constantly updates the parameter z-index of the player character to
match the value of its y-axis. This makes it possible to define objects where
the player walks behind and in front of depending on its y-position.
See this graphic:
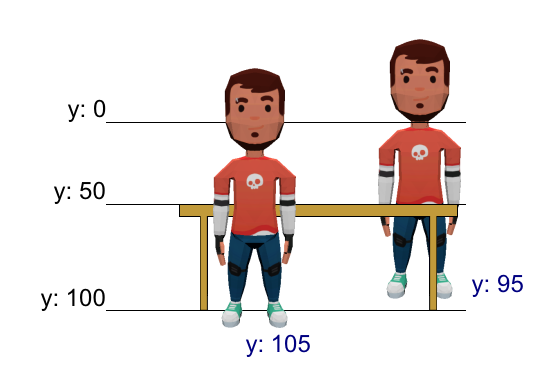
When the character is at y position 95, they stand behind the table. At position y = 105, they stand in front of the table. To achieve this effect in Escoria, we would simply set the “z-index” property of the table item to “100”.
For the barrels, though, the character should never walk in front of them,
only behind them. So we can set the barrels’ z-index property to the
height of the background.
Hint
To figure out the proper value of the z-axis parameter, you can use the
ruler feature of Godot to measure the y position of where the base
position of your character needs to be in order to have Graham walk in front.
Warning
Another property, Z As Relative, is checked by default, meaning that
the z-axis property will also take the z-axis property of its
parent (in this case, the ESCRoom node). Usually, the z-axis
property of the parent is set to 0, but keep this warning in mind in case it
isn’t and the walkbehind effect doesn’t work properly.