Handling an inventory
Most adventure games feature inventory puzzles: Things you pick up and combine with other things which are then used in the game. Classic adventure games made use of the inventory concept extensively!
Escoria has features for handling inventory items as well, of course. Let’s embed them into our sample game.
The inventory items path
Inventory items are movable. They don’t (usually) stay in just one specific room. This poses a problem for Escoria, because when rooms are changed, the previous room is removed from Godot’s scene tree, together with the items in there.
To get around this, inventory items must be placed in a special path where Escoria can find them whenever needed. This path is called the “inventory items path”, and in the game template it defaults to “res://game/items/inventory”.
Hint
You can change it to point somewhere else in Escoria’s settings
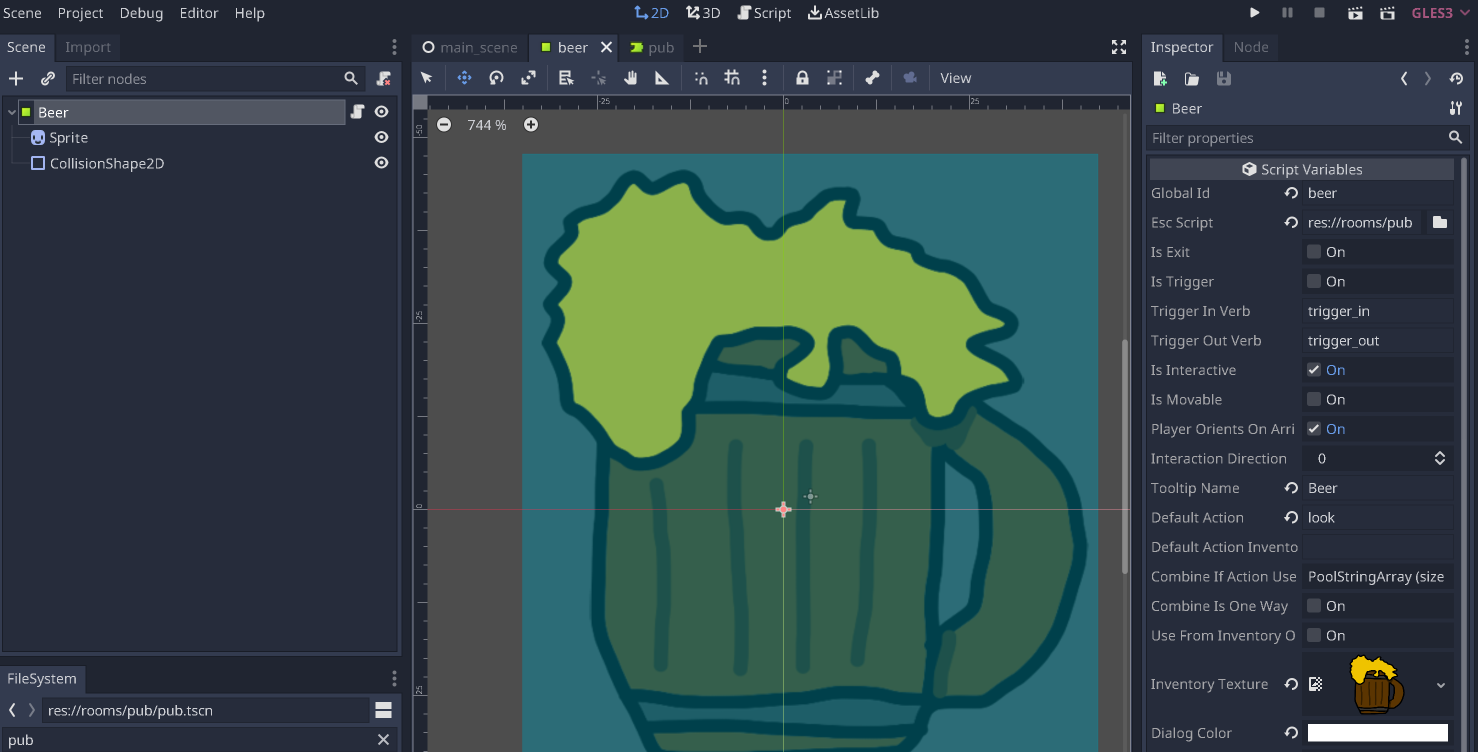
Creating an inventory item
Inventory items are also simple ESCItem instances that you saw in the
previous chapter.
Start by copying over the mug.png file to the “items” directory.
Then, create a new scene and select ESCItem as its root node. Rename it
to “Beer” and set “beer” as its Global ID.
Add a Sprite2D node and use the mug image as its Texture. Also, be
sure to add a CollisionShape2D node to define the area of interactivity
like before.
Finally, create a new ASHES script called “beer.esc” and place it in the “items” folder as well. Leave the script empty for now.
Copy the path to the script and put it in the Esc Script parameter.
Hint
The parameter Inventory texture will automatically be set to the
texture set in the Sprite2D node. If you want the item to look
different when it’s in the inventory, you can simply change this
parameter to a different texture.
Save the scene as “beer.tscn” in the “items” folder.
Using the item in the room
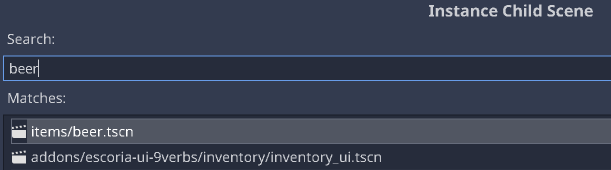
To use this new item in the pub scene, we can use Godot’s “instantiate scene” feature.
Select the ESCRoom root node and click on the “instantiate scene”
button:

Then select the beer item scene.
Now you can place the mug in the scene.
Picking up the mug
To let Graham pick up the mug, we’ll have to create a new event in our
ASHES script called pickup because that is the verb we’ll be using.
To add a new item to the inventory, the command inventory_add is used.
It expects the global id of the item to add as its only argument.
Additionally, we need to hide the mug in the scene. We can use the command
set_active for that. Inactive items are not visible in a scene.
To put it all together, this is the code you should add to the ASHES file:
:pickup

  inventory_add("beer")
  set_active("beer", false)
Try it out: Graham should now be able to pick up the mug!
Hint
Depending on where you place the mug, you may need to set an
ESCInteractionLocation node as a child of the instantiated beer scene.
This is really only necessary if the mug is in a location that Graham can’t
reach via the walkable area.
Using the mug
Usually, items are not only picked up but also used with different items either in the inventory or in a particular room.
This is also done using events in the ASHES script. Apart from the event name
:use, the target object is also specified.
Let’s have Graham react to using the mug with the blackboard.
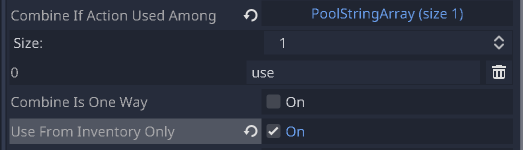
For this, we need to tell Escoria that using the beer from the inventory should wait for a second clicked target object. Then we can react to that targeted action in the ASHES script of the blackboard.
So go into the beer item scene again and select the property, Use from
inventory only. Now, if you wish to use the verb “use” with the beer, this
interaction will only be permitted if the beer is in the inventory.
Add an item to the list in the setting Actions Requiring Target Object and
set it to “use”. This means that when the player selects “use” on the beer,
Escoria treats the beer as the source object and waits for the player to click
another target object.
Save the scene and add the following code to the “blackboard.esc” file:
:use beer

  say($graham, "Why should I throw it at the blackboard? I'm not angry!")
Try it out!
Note
Actions Requiring Target Object is not the same setting as
Default Action Inventory. The default action controls which verb is used
when the player clicks the item in the inventory. If that verb needs another
clicked object, the same verb must also be listed in
Actions Requiring Target Object.
Add in some game logic
Let’s make the game a little more interesting by adding some logic to change how the game reacts to events.
From your previous lesson, the “blackboard.esc” file should contain the following.
:look
  say($graham, "That's good to hear. I'm thirsty.")
Let’s now change how Graham responds based on whether he has picked up the drink.
To do this, we need a conditional statement where we look at whether something is in a particular state and act accordingly.
Conditionals in ASHES appear very similarly to those in GDScript and Python. ASHES provides for the use of “if”-statements, allowing one (or more) conditions you wish to check.
The state of boolean (true/false) conditions can be negated/reversed with the use of
the ! symbol or the keyword `not`..
Examples of conditional checks are:
if $beer in inventory:`: is the “beer” in your inventoryif not $beer in inventory:`: is the “beer” NOT in your inventoryif total_coins > 5:`: is the value of the “total_coins” variable greater than 5?
Note
The in inventory keywords are special, reserved keywords meant to be used together
for checking whether a global id currently exists in the player’s inventory.
Modify your “blackboard.esc” to the following :
:look
  # If I've picked up the beer
  if $beer in inventory:
      say($graham, "I don't need a cocktail, I've got a beer.")
  else:
    # If I haven't picked up the beer
      say($graham, "The cocktails might be free, but I feel like a beer.")
Hint
The if...else... pattern above is used in place of separating mutually-exclusive
clauses into their own. In other words, an equivalent block of code would be:
:look
  # If I've picked up the beer
  if $beer in inventory:
    say($graham, "I don't need a cocktail, I've got a beer.")

  if not $beer in inventory::
    # If I haven't picked up the beer
    say($graham, "The cocktails might be free, but I feel like a beer.")
Run the game again. Try “looking” at the blackboard both before and after you’ve picked up the beer to see how the response changes.
You can also look up more information on conditional logic in ASHES.