The first run
We’d like to test out what we have done so far, but first we need to tell Escoria what to do when a new game starts!
Our first ASHES script
This is done using ASHES, the integrated Escoria scripting language.
While you could use GDscript (or other languages supported by Godot) directly, we added ASHES as a language tailor-made for adventure games, so the most typical game commands (like making a character speak, letting them walk across the room, etc.) are very easy to use.
The game’s start-up routine itself is also coordinated using an ASHES script.
Scripts are plain text files with an “.esc” extension, created in any text editor you choose to use.
Create a new ASHES script which will be our main game script and call it “game.esc”.
Switch to Godot’s Scripts tab and select “New Text File” from the “File” menu:

Note
In the future, the “.esc” extension will be replaced by “.ash”, but for compatibility reasons the original “.esc” extension should be used for the time being.
Save the new file as “game.esc” in your root game folder:

This will open the new script directly in the editor.
ASHES scripts are built-up using “Events” and “Commands”.
An ASHES Event starts with a colon (:) and is followed by the name of the
event, e.g. :look
There are several special names for events which you will learn later on, but
the one event type we need right now is newgame which is run when the player
clicks on the “New Game” button in the main menu.
Hint
There is also a special event called setup. This is related to
the order things happen in more complex game rooms and is not necessary for
every script. It can be safely ignored for now.
We basically just want Escoria to switch to our new pub scene. For this, we can use the command change_scene. This command expects the path to the target scene as an argument.
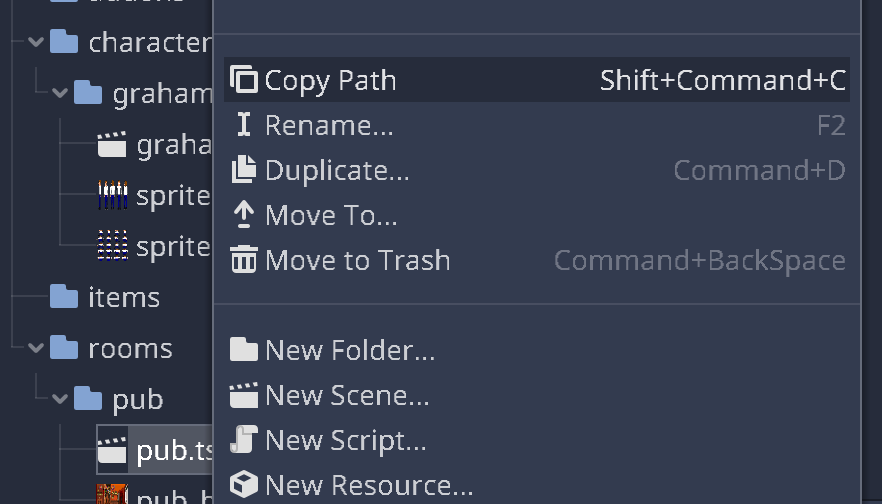
Getting that path is easy to do in Godot: Just find the pub scene in the file tree, right click on it, and select “Copy Path” from the context menu:
Now add the following to the ASHES script game.esc:
:newgame

  change_scene("res://rooms/pub/pub.tscn")
Hint
All ASHES events should appear as the first word on its own line, without any spaces or indents to its left!
Hint
ASHES is similar to GDScript and Python: Make sure to indent script blocks appropriately (more on this in the ASHES Language Reference).
Hint
If you saved the scene using a name other than “pub.tscn” (e.g. “room1”), the argument above should reflect that scene’s path, e.g. “res://rooms/pub/room1.tscn”)..
But what should happen when the game starts before the main menu is shown?
Well, that’s also handled by the same script by using an init event.
You could add introduction sequences, studio logos, etc. to that event. For the moment, we only want to show the main menu–further evidence of Escoria being very adaptable to your specific game’s needs!
Thus, we don’t default to any main menu scene. We’ve added a stock main menu for convenience, though, which we will load now.
Add this code to the script:
:init

  show_menu("main")
This instructs the installed UI addon to show the main menu.
The complete script file should look like this now:
:init

  show_menu("main")

:newgame

  change_scene("res://rooms/pub/pub.tscn")
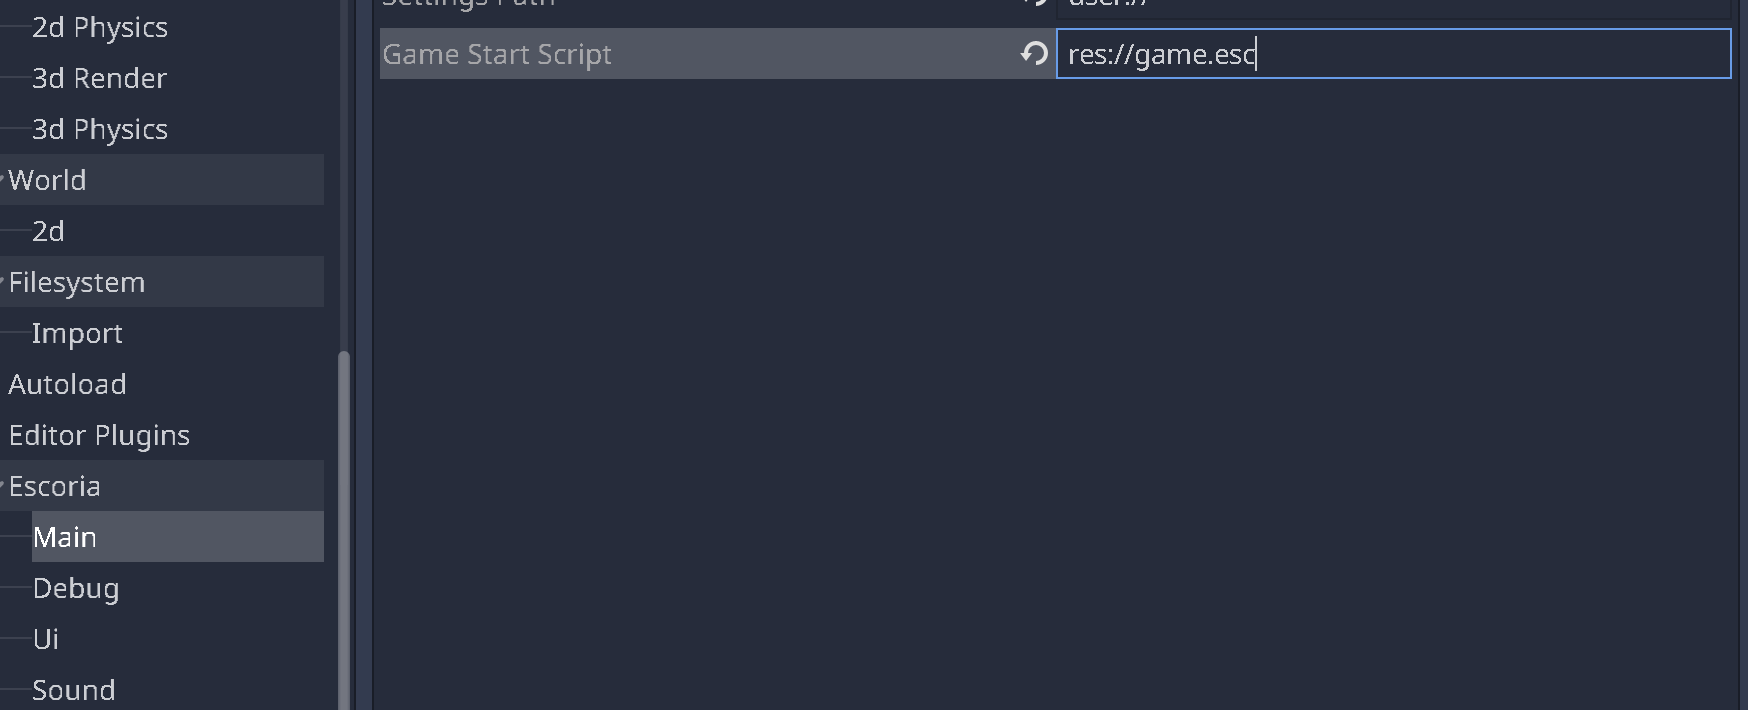
Now that we have our game script ready, we need to set it in the Escoria project settings using the Game Start Script parameter in the Main category.
Hint
Remember that you may need to enable the Advanced Settings toggle in order to see the Escoria-specific project settings!
The setting should look like this.
Hint
You can copy the path to the ASHES file by right-clicking the file in the editor:

Starting the game
We need to make sure that Escoria knows which game scene to use. A game scene is used by Escoria as the “entry point” for the entire game and typically contains a complete implementation of a user interface (UI).
Hint
Make sure a valid game scene is specified in the Escoria project settings under “UI” -> “Game Scene”.
Now you’re ready to start the game! Click on Godot’s run icon to do so.
Click on “New Game” in the main menu and check out your character walking around in the new room!
Slowing Graham down
As you can see, Graham is pretty much running through the pub. Also, he looks a bit like he’s skating through it.
So we should make him walk slower and at the same time speed up the walking animation.
To achieve this, go back to the character, select the ESCPlayer node,
and set the Speed property to “150”. Additionally, select the
AnimatedSprite2D node and set the Speed scale parameter to “1.8”.
Try starting the game again. Graham should walk much more naturally.
Next, let’s make the room more interactive.